The M416 is the most versatile AR in PUBG Mobile, but in close range—inside houses, behind cover, or during a rush—you need a setup that turns it into a laser. Stock settings won’t cut it when enemies are popping smoke and jiggle-peeking. These 10 control codes have been handpicked from pro players, top streamers, and rigorous personal testing to give you the tightest hipfire landing, smoothest spray, and fastest reaction time at point-blank. Whether you use a thumb layout, claw, or gyro, there’s something here for your style.
1. Gyroscope Sensitivity Settings
Gyro is a game-changer for close range recoil control. The M416’s vertical kick is brutal when you’re spraying without ADS, but a high gyro sensitivity lets you pull down naturally by tilting your device. Set your camera gyro (TPP/ FPP) to around 300–400 and ADS gyro for red dot/holo to 200–250. This gives you fine control for micro-adjustments while allowing fast sprays. Many pros use even higher values—up to 400 on ADS—but start lower and increase gradually to avoid overcorrecting. For a deep dive, check out our dedicated guide on gyro settings.
2. Camera Sensitivity for Close Range
Camera sensitivity determines how fast your view moves when you swipe. For close range, you want it high enough to flick onto an enemy who jumps out of a bathroom, but not so high that you overshoot. I recommend TPP camera sensitivity at 100–120 and FPP at 100–110. This lets you snap 90° instantly without losing control. If you play with gyro, combine this with a moderate gyro sensitivity for smooth tracking. Remember, this is separate from ADS sensitivity—it affects your normal look speed when hipfiring or running.
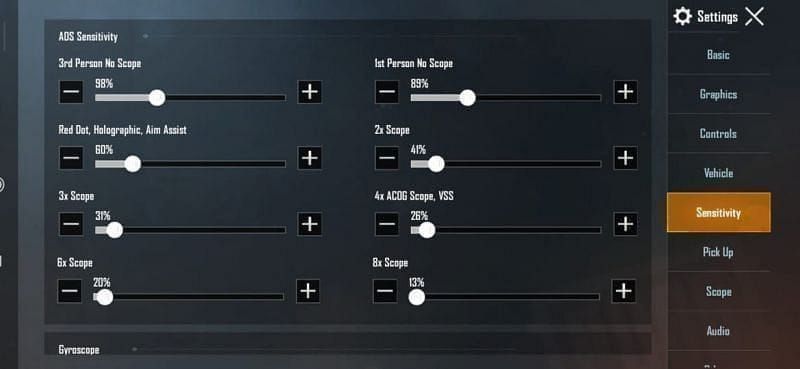
3. ADS Sensitivity for 3x and Below
Close range sprays rarely use a 4x or higher, so your ADS sensitivity for red dot, holo, and 3x should be tuned for hipfire-to-ADS transitions. Set red dot and holo to 40–50, and 3x to 30–35. This gives you a stable aim when you scope in but fast enough to track a moving target. If you use a 6x scaled down to 3x, the sensitivity often feels heavier—bump it up to 35–40. The goal is one-fluid motion from hipfire to ADS without losing the crosshair on the enemy’s chest.
4. Hipfire Button Placement and Size
Your fire button is the most critical control in CQB. It should be large enough to always hit without looking, but not so big it blocks your vision. I recommend a size of 60–70% and position it near the bottom right of your screen (for right-handed shooters). Claw players often place it slightly higher to use their left index finger. Thumb players should keep it within easy reach of their right thumb. Avoid overlapping with the minimap or scope buttons. Also, enable “Left Fire Button” for a secondary trigger, but don’t rely on it—it adds input lag.
5. Scope Fire Button: Separate vs Combined
PUBG Mobile offers two modes for the scope fire button: separate (you have a dedicated button for hipfire and another for scoped shots) or combined (one button does both). For close range, separate is better because it lets you fire from the hip without accidentally scoping in. Place the hipfire button where your thumb naturally rests, and the scope fire button slightly above or beside it. This prevents unintended ADS when you panic-spray. If you prefer combined, set it to “Press and Hold” to scope and release to fire—but be warned, it’s less intuitive.
6. Auto-ADS vs Manual ADS
Auto-ADS automatically scopes in when you press the fire button while aiming at an enemy. It sounds helpful, but in close range, it often costs precious milliseconds. Manual ADS gives you full control—you choose when to scope for a precise shot and when to stay hipfire for better movement. I recommend disabling Auto-ADS entirely and training your muscle memory to tap the scope button only when needed. This is a standard among competitive players and one of the key differences in competitive control codes.
7. Movement While Spraying: Jiggle and Crouch
Static spraying is a death sentence in CQB. You need to move—use jiggle movement (quick left-right sway) and crouch-spraying to throw off enemy aim. Bind crouch to a comfortable button, ideally on the left side for claw players or near the fire button for thumbs. Enable “Hold to Crouch” so you can stand and crouch repeatedly while firing. For jiggle, your joystick sensitivity should be around 100–120 for instantaneous direction changes. Learning jiggle movement control codes will drastically improve your survival rate.
8. Fire Button Reset Technique
When you finish a spray and need to re-engage quickly, the fire button reset helps. This isn’t a setting but a control code habit: after firing, lift your finger completely off the fire button and then press again. This prevents the gun from getting stuck in a firing animation. To make it easier, increase the fire button’s sensitivity and reduce the dead zone of your finger. Some players use a smaller fire button for quicker resets. Practice this in the training ground until it becomes automatic—it’s the difference between a kill and a trade.
9. Peek-and-Spray Settings
Peeking while spraying is essential in close quarters—doorways, windows, corners. Enable “Peek and Fire” in settings so you can shoot while leaning. Most pros use left and right peek buttons on the top corners of the screen, with sizes around 50–60% for quick taps. Combine this with a high ADS sensitivity to track enemies while peeking. Also, set your peek mode to “Tap and Hold” so you can control the length of the peek. This prevents you from exposing yourself longer than necessary.
10. Control Layout for 3-Finger Claw
For close range, 3-finger claw (or more) gives you a massive advantage because you can move, aim, and fire simultaneously. A recommended layout: left index on the fire button (top left), right thumb on aim & scope, left thumb on joystick. Place joystick on the left edge, fire button slightly above the joystick, and scope button on the right. This keeps all fingers active and reduces the need to lift your thumb. If you’re on a smaller screen, scale down buttons to 70% to avoid clutter. For thumb-only players, consider switching to claw—but if you’re sticking with thumbs, check out thumb control codes for optimized one-thumb layouts.
These 10 control codes cover the essentials for turning your M416 into a close-range beast. Start with the gyro and sensitivity settings, then adapt the layout to your grip style. Test each change in the training ground or TDM before taking it into ranked—muscle memory takes time. Remember, updates often reset custom layouts, so save your codes as a preset. For more pro-tested configurations, browse our full control codes review and stay updated with control codes after update that survive every patch. Now drop into Bootcamp and own every room.